How to Spot Signs of Previous Water Damage in Your NEPA Home
FEMA recently redesignated thousands of properties across Northeast Pennsylvania as lying in a flood plain, forcing several residents to purchase flood insurance.
Major floods like Tropical Storm Lee in 2011 have left their mark on the region, submerging thousands of properties across Luzerne County in dangerous floodwater. However, water damage isn’t always the result of flooding or heavy snowfall, but can come from structural defects or burst pipes.
If left unresolved, continuous water damage can result in mold and mildew, a bulk of which hides beneath the surface and requires special inspection.
For homeowners looking to purchase a home in Northeast Pennsylvania, identifying water damage could be the difference between expensive repairs and mold remediation.
This guide will help you uncover signs of water damage yourself, as well as tools and services available to inspect for water damage and mold.
Why Water Damage Is Such a Serious Issue
Water intrusion can start small in the form of basement or roof leaks and slowly damage the structure of the house until major repairs are required.
According to Angi, the average cost of repairing water damage is between $3 and $7.50 per square foot, meaning that small leaks caught early can be manageable, but whole-home issues could total over ten thousand dollars easily.
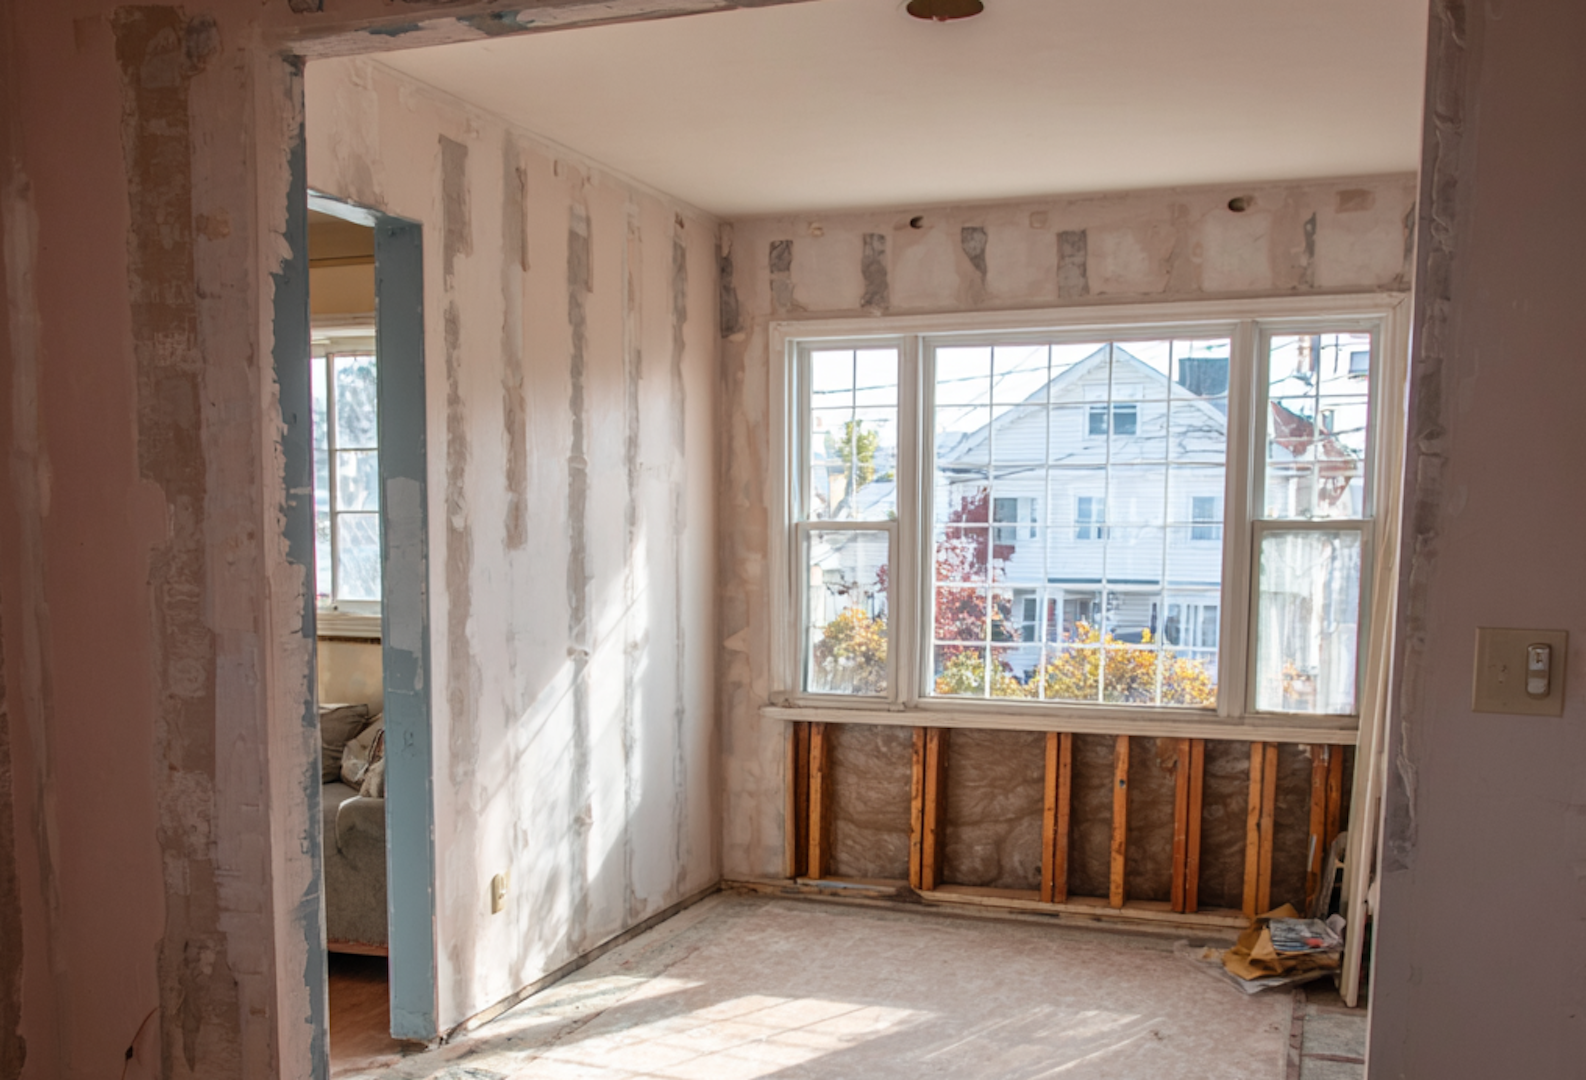
The extent of water damage is often more than meets the eye. Many homeowners may cover over previous water damage on walls and ceilings with new paint, concealing the true depth of the damage, which will be missed without a proper home inspection. Considering that a majority of homes in the region are wood-framed, water exposure to framing components and drywall can rot your home from the inside out very quickly.
Finally, as we’ll discuss below, uncovering water damage can make it difficult for homeowners to insure or acquire a mortgage. Therefore, it’s important to be proactive and spot the signs of water damage before they become unmanageable.
The Three Main Types of Water Damage
An important component of visually inspecting water damage is understanding what type of damage you are dealing with. Water damage can be classified by its source and contamination level, which directly affects cleanup procedures, health risks, and repair costs.
- Clean water damage typically comes from a controlled source—like a burst supply line, leaky faucet, or overflowing sink. While clean water seems harmless, it can soak into porous materials and cause warping or mold growth within 24 to 48 hours if not dried properly.
- Gray water damage comes from appliances such as washing machines or dishwashers. It contains mild contaminants like detergents or food residue, which can create unpleasant odors and encourage bacterial growth. If absorbed into carpets or drywall, gray water damage often requires partial replacement rather than simple drying.
- Black water damage is the most dangerous, originating from sewage backups, river flooding, or storm runoff. Black water carries bacteria, waste, and chemicals that can pose serious health risks and almost always demand professional cleanup and disinfection.
Knowing what kind of water caused the problem helps inspectors determine both how extensive the damage is and why certain repairs are necessary to prevent recurrence.
How to Spot Visible Signs of Previous Water Damage
Not all signs of water damage are obvious at first glance. Many homeowners unknowingly live with the remnants of past leaks or flooding because they’ve been cosmetically covered up. Here’s how to identify the most common clues.
- Stained or discolored walls and ceilings. Yellow, brown, or rust-colored rings on drywall or plaster suggest that water once seeped behind the surface. Even if painted over, these stains often bleed back through over time.
- Peeling or bubbling paint. Moisture is trapped beneath the surface. As water vapor pushes outward, it causes the paint to lose adhesion, blister, or flake. This often happens near bathrooms, basements, or exterior walls that weren’t properly sealed.
- Warped or buckled flooring. Hardwood planks that cup or laminate panels that swell at the edges are telltale signs of a past leak or high humidity. In flood-prone parts of Pennsylvania, basement flooring often hides this damage under rugs or vinyl overlays.
- Musty odors. If you notice a damp or earthy smell in a finished basement, crawl space, or under a sink, it’s often a sign of mold or residual moisture trapped inside materials.
- Mold or mildew growth. Appears as black, green, or white spots along baseboards, corners, or behind furniture. Mold doesn’t appear unless there’s been sustained moisture, so its presence almost always points to prior water intrusion.
- Sagging ceilings or softened drywall. These structural changes occur when materials lose rigidity after prolonged exposure, often from roof leaks or pipe bursts hidden in upper floors.
If you spot any signs of current or previous water damage, contact a professional home inspector right away to determine the extent of the damage.
How Home Inspectors Spot Hidden or Structural Water Damage
Professional home inspectors use specialized tools and techniques to detect water damage that isn’t visible to the naked eye.
Inspectors often begin with moisture meters to measure the exact moisture content within walls, ceilings, and floors. By comparing readings across different sections of the home, they can determine where water was absorbed and how far it spread.
They also use infrared (thermal) cameras to locate cold spots that indicate trapped moisture. Water cools more slowly than dry materials, so these cameras can reveal leaks behind walls, under insulation, or around window frames—areas that may look fine on the surface.
Inspectors will check attics and crawl spaces for subtle indicators such as rusted nails, water-stained insulation, or discolored sheathing. These spaces often reveal roof leaks or poor ventilation that can lead to long-term dampness.
Finally, they will inspect plumbing systems and foundation areas, looking for mineral deposits, corrosion, or efflorescence—a white powdery substance that forms when moisture seeps through masonry. These signs tell inspectors how water traveled through the home and why certain repairs may be needed to stop future leaks.
Because water can move in unpredictable ways, professional inspections are often the only way to uncover the full extent of damage after storms or floods.
Does Previous Water Damage Affect Home Insurance?
Water damage can impact your home insurance, but the impact depends on how and why the damage occurred. Insurance companies distinguish between sudden events, like burst pipes, and gradual problems, such as long-term seepage. Sudden damage is typically covered, while gradual damage is often excluded.
Homes in designated flood zones, such as along the Susquehanna or Lackawanna Rivers, may also require separate flood insurance. Standard homeowners’ policies do not cover flood-related damage, which is why documentation from professional inspections can make a big difference when applying for coverage or filing claims.
Insurers may raise premiums or limit coverage if a home has a history of multiple water claims. Having a clear inspection report that shows how and when damage was repaired helps protect your eligibility and ensures transparency during property sales.
How to Protect Your Home from Future Water Damage
Preventing future water damage in Pennsylvania starts with understanding how local weather and terrain affect your property. Here’s how to reduce the risk of future water damage:
- Inspect your roof and gutters twice a year. Clean debris and check for damaged shingles before snow or heavy rain arrives.
- Seal foundation cracks. Use waterproof epoxy or sealant to prevent groundwater from seeping through basement walls.
- Install or maintain a sump pump. Test it before storm season to ensure it can handle runoff and snowmelt.
- Improve drainage around your property. Extend downspouts at least five feet away from your foundation to keep water moving downhill.
- Maintain proper indoor humidity. Use dehumidifiers in basements or crawl spaces to keep moisture below 50%.
- Schedule annual inspections. Professional home inspections catch minor leaks, roof wear, or ventilation problems before they turn into costly repairs.
Taking these steps helps protect your home against the same threats that cause widespread damage across Northeast Pennsylvania each year.
FAQs
What areas in Northeast Pennsylvania are most prone to flooding?
Low-lying regions along the Susquehanna River, such as Kingston, Forty Fort, and West Pittston, are in high-risk flood zones. Parts of Stroudsburg, Scranton, and Wilkes-Barre have also experienced repeated basement flooding due to poor drainage and old stormwater systems.
How can I tell if a home in a flood zone has been damaged before?
Look for water lines on basement walls, rusted support beams, or signs of fresh paint that may cover old stains. A professional inspector can verify whether the damage is recent or historical using moisture and infrared tools.
Are homes with previous water damage harder to insure in Pennsylvania?
Yes. If a property has a record of frequent water claims, insurers may increase rates or require additional inspections. A clean, documented inspection report helps maintain eligibility.
How often should I schedule a home inspection for water damage?
Annually is best, especially after major storms or rapid snowmelt. Regular inspections help identify early warning signs before they develop into major repairs.
How Snow and Ice Can Damage Your NEPA Roof (and How to Spot It)
Scranton, Pennsylvania, averages around 41” of snowfall annually, putting it over 10” above the national average.
Much of that snow will stick to your roof all winter long, placing heavy pressure on your roof and eroding asphalt shingles, which can lead to structural damage.
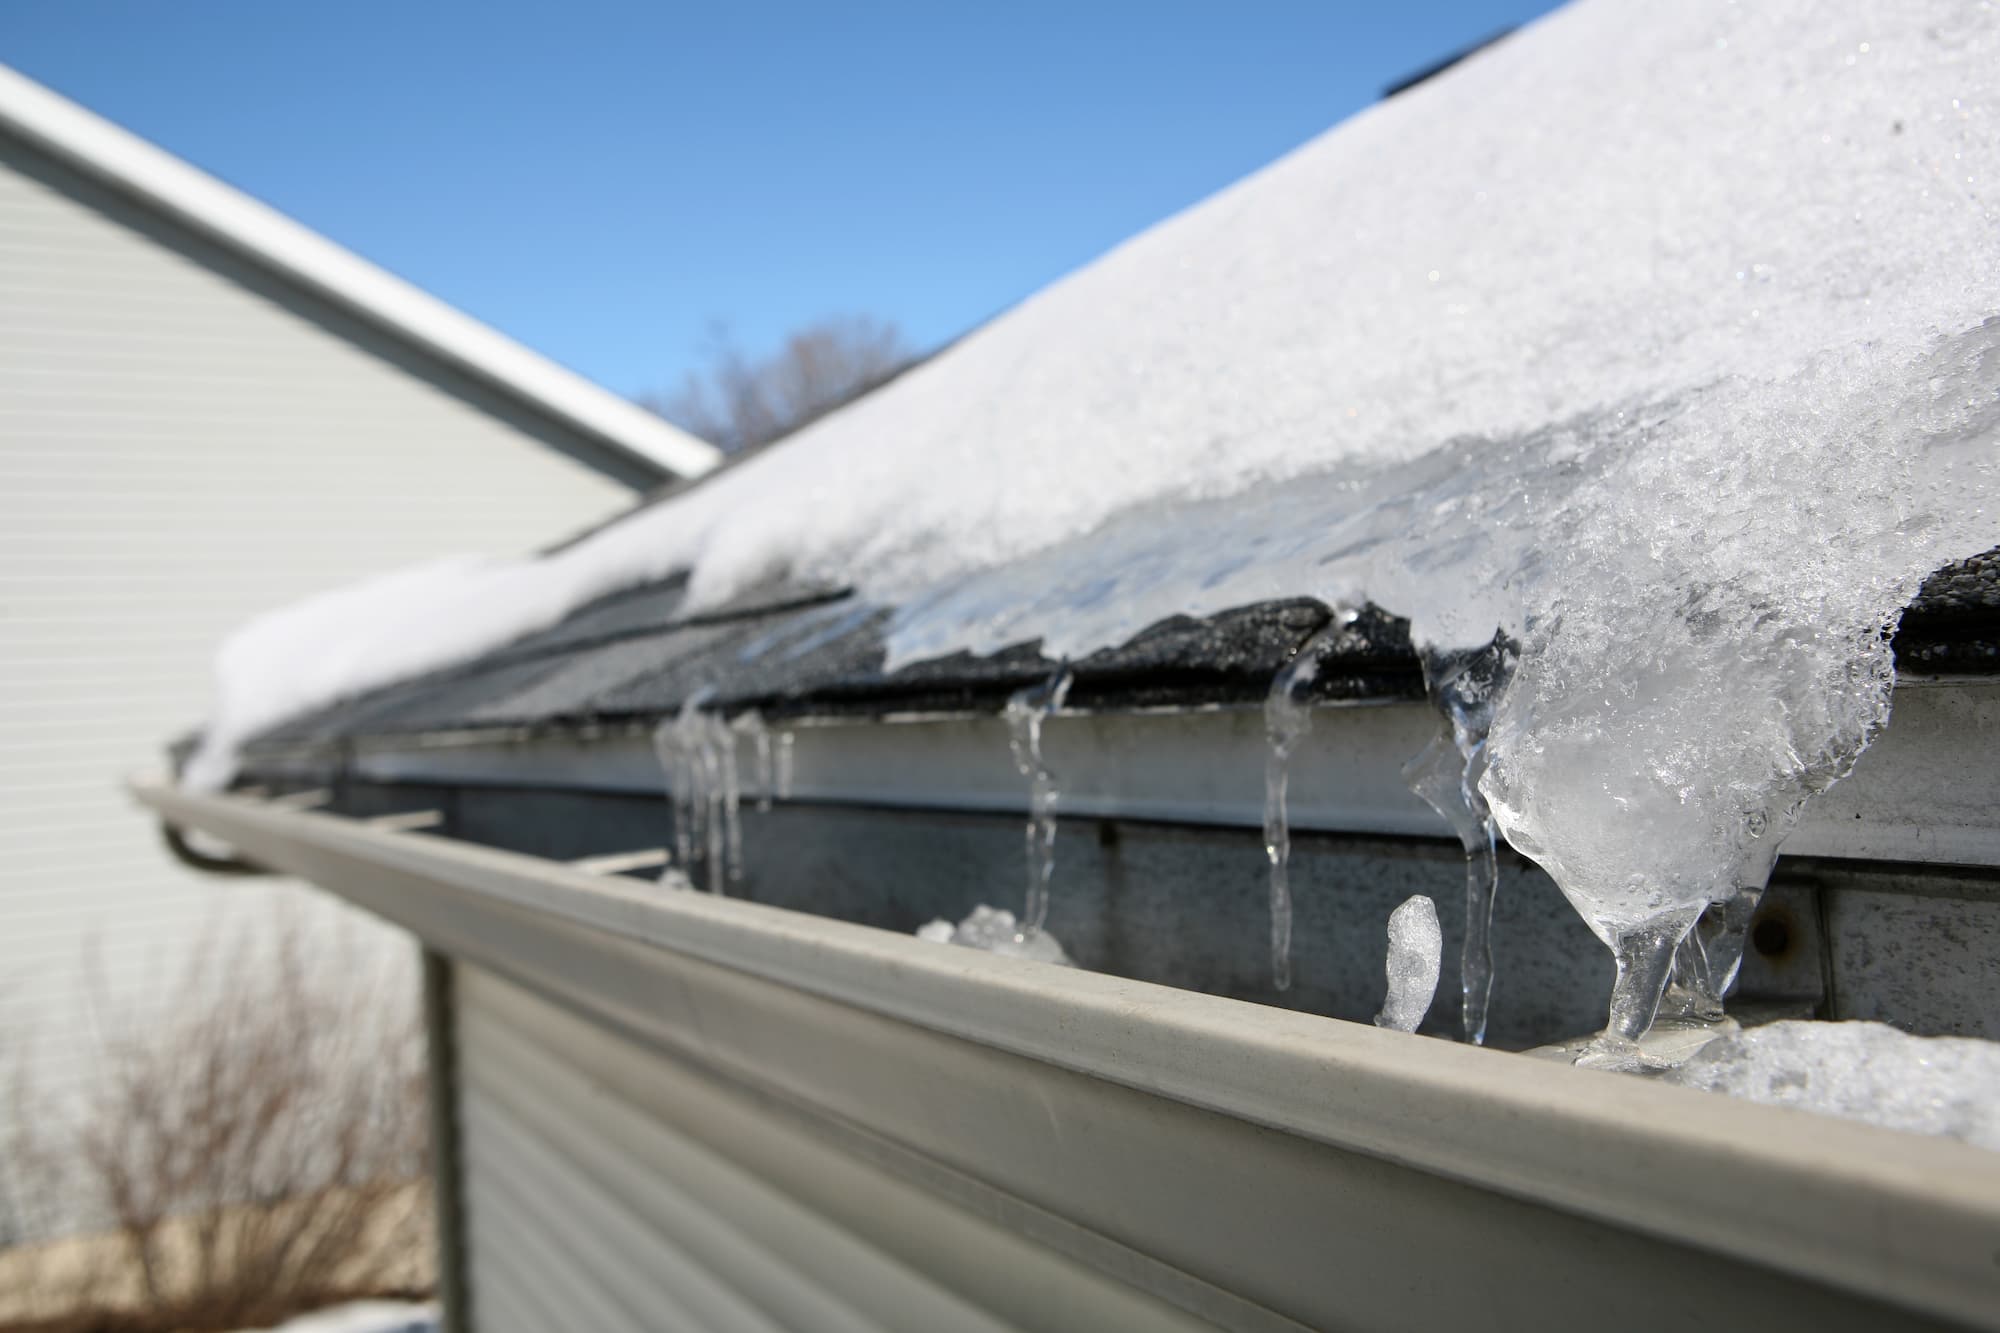
However, the real danger of snowfall comes from ice dams, which form on the perimeter of your roof as snow melts and freezes. Most modern roofs are now built with ice and water barriers, but if your roof is old or outdated, it may not have proper protection.
Ice can also freeze standing water in gutters, forcing melting snow to accumulate around your foundation.
This guide will discuss several winter threats to roofs in Northeast Pennsylvania and ways to winterize your roof for Pennsylvania’s frigid winters.
How Winter Weather Puts Roofs at Risk
Your roof is built to withstand a lot in order to protect your home, but older or poorly installed roofs may suffer from eroded shingles, ice dams, or leaks that put your home and attic at risk. During the winter, a combination of moisture, freezing temperatures, and the weight of snow and ice can push roofing materials and structures past their limits.
Here are a few of the key culprits to watch out for this winter:
- Snow accumulation: Even light, fluffy snow adds up in weight. Wet, heavy snow can weigh up to 20 pounds per cubic foot, creating thousands of pounds of stress on your roof.
- Ice formation: When snow melts and refreezes, it forms thick layers of ice that trap moisture and block proper drainage.
- Freeze-thaw cycles: Repeated melting and freezing cause roofing materials to expand and contract, weakening seals and loosening shingles.
Together, these forces can cause a chain reaction of roof damage that starts small but worsens rapidly with every storm.
Top 6 Winter Threats to Roofs in Pennsylvania
1. Ice Dams
Ice dams form when warm air from your attic melts the underside of the snow on your roof. As meltwater runs down to the roof edge, where it’s colder, it refreezes, creating a ridge of ice.
Once that ice dam forms, new meltwater can’t drain off properly, causing the water to pool behind the dam and seep under shingles and flashing, leaking into your attic or walls.
Many homeowners are largely unaware of ice dams and may ignore obvious signs, such as icicles hanging from the edges of their roof.
Signs of Ice Dam Damage
-
- Water stains or bubbling paint on ceilings and walls
- Icicles hanging from eaves or gutters
- Mold growth in the attic or insulation
- Damp or compressed attic insulation
- Water stains or bubbling paint on ceilings and walls
How to Prevent Ice Dams
-
- Improve attic insulation and ventilation: Proper airflow keeps your roof’s surface cold and prevents uneven melting.
- Seal attic leaks: Warm air escaping from vents, chimneys, or light fixtures contributes to snow melt.
- Use a roof rake: Gently remove snow buildup near the edges after major storms (without climbing onto the roof).
- Consider heat cables: Electric de-icing cables can help melt ice along the eaves in problem areas.
- Improve attic insulation and ventilation: Proper airflow keeps your roof’s surface cold and prevents uneven melting.
2. Structural Stress from Heavy Snow
A little snow looks harmless, but when accumulation builds up, your roof can experience extreme weight loads. This is especially risky for older homes, flat or low-pitched roofs, or structures with aging support beams or damaged sheathing.
Wet snow can be particularly heavy. For example:
- 10 inches of fresh snow = roughly 5 pounds per square foot
- 10 inches of wet snow = up to 20 pounds per square foot
If several storms pile on before melting, that weight can cause sagging, cracking, or even collapse.
Signs of Snow Load Damage
-
- Sagging rooflines or ceilings
- Cracking or popping sounds in the attic
- Doors and windows that suddenly stick or misalign
- Leaks around roof penetrations (vents, chimneys, skylights)
- Sagging rooflines or ceilings
How to Relieve Accumulated Snow Pressure
-
- Use a roof rake from the ground to remove excess snow.
- Hire a professional for deep or compacted snow removal—never climb onto a snow-covered roof.
- If you notice sagging or cracking, call a roofing or structural expert immediately.
- Use a roof rake from the ground to remove excess snow.
3. Shingle and Flashing Damage
The constant freezing and thawing of winter can be brutal on asphalt shingles and metal flashing. As water seeps into small cracks or under lifted shingles, it freezes, expands, and causes further separation. Over time, this leads to broken seals, curling shingles, and corrosion.
Signs of Shingle or Flashing Damage
-
- Missing, cracked, or curled shingles
- Exposed nail heads or flashing that’s lifting
- Dark streaks or granule loss on shingles
- Water stains around chimneys, skylights, or vents
- Missing, cracked, or curled shingles
Maintenance Tips for Shingles and Flashing
-
- Inspect your roof before and after winter storms.
- Keep gutters and downspouts clear so meltwater can drain properly.
- Replace damaged shingles or flashing promptly to prevent leaks.
- Inspect your roof before and after winter storms.
4. Gutter and Downspout Issues
Gutters play a vital role in directing meltwater away from your roof and foundation, but when they’re clogged or frozen, it can allow water to accumulate around your foundation.
Additionally, ice accumulation in gutters can cause them to pull away from the roofline, damage fascia boards, and create dangerous icicles. When meltwater has nowhere to go, it can also back up under shingles and into your home.
Signs of Gutter Trouble
-
- Ice hanging off the roof edges
- Water dripping down siding even when it’s not raining
- Detached or sagging gutters
- Pooling water around the foundation
- Ice hanging off the roof edges
How to Maintain Gutters During Winter
-
- Clean gutters thoroughly before winter.
- Make sure downspouts extend several feet away from your home.
- Add gutter guards or heating cables if ice buildup is a recurring issue.
- Clean gutters thoroughly before winter.
5. Hidden Water Intrusion and Mold Growth
Not all winter roof damage is visible right away. Water that seeps through the roof deck or insulation can take weeks—or even months—to show up as visible staining or mold.
Over time, trapped moisture weakens your attic structure, reduces insulation performance, and fosters unhealthy air conditions.
How to Spot Hidden Moisture Damage
-
- A musty odor in the attic or upper floors
- Peeling paint or bubbling drywall
- Damp insulation or visible mold patches
- A sudden increase in heating bills (a sign that insulation has been compromised)
- A musty odor in the attic or upper floors
If you suspect moisture damage, it’s best to have a professional roof or insulation inspection. Thermal imaging can also help identify hidden wet spots before they spread.
6. Freeze-Thaw Damage on Flat Roofs
Homes and commercial buildings with flat or low-slope roofs face unique winter challenges, as meltwater tends to pool instead of draining, allowing it to refreeze overnight and damage membrane seams.
How to Identify Flat Roof Damage
-
- Ponding water that lasts more than 48 hours after melting
- Cracked seams or bubbles in the roofing membrane
- Leaks appearing around vents or rooftop equipment
- Ponding water that lasts more than 48 hours after melting
Keeping drains and scuppers clear is key. Professional maintenance before and after the season can save thousands in repair costs.
How to Inspect Your Roof After Winter
The best way to prevent winter roof damage is to conduct an inspection before and after the winter season.
Perform a visual inspection in the fall, winter, and spring to spot potential issues as they manifest on your roof, looking for:
- Uneven snow melt (which can indicate poor insulation or ventilation)
- Missing shingles, sagging areas, or exposed wood
- Gutters containing icicles, ice dams, or debris buildup
- (Attic) Damp insulation, mold, or daylight that can be spotted through the roof boards
If you spot any warning signs, schedule a professional roof inspection. A home inspector can safely assess hidden damage and recommend targeted repairs before leaks and rot take hold.
Protecting Your Roof Year-Round
Winter roof damage is often preventable with the right preparation and maintenance. Here’s how to stay ahead this winter:
- Schedule a pre-winter roof inspection: A professional can identify weak spots before the first snow falls.
- Add insulation and ventilation: A balanced attic temperature prevents ice dams and reduces energy costs.
- Clean gutters and downspouts regularly: Proper drainage is your roof’s first line of defense.
- Trim overhanging branches: Snow-laden limbs can break and damage shingles or gutters.
- Address small repairs immediately: A minor leak in December can become major water damage by March.
By keeping on top of basic maintenance and performing a visual inspection of your roof each season, you can spot issues before they compound. When issues do pop up, be sure to contact a professional inspector immediately to determine the next steps.
FAQs
How can I tell if ice dams are forming on my roof?
Look for large icicles hanging from the eaves, water stains on your ceiling or walls, and uneven snow melt across the roof. These are all common signs of ice dam formation.
Is it safe to remove snow from my roof myself?
You should never climb onto a snow-covered roof. Use a roof rake from the ground to remove excess snow, or hire a professional if buildup is heavy or difficult to reach.
How much snow is too much for a roof to handle?
Most roofs can support about 20 pounds of snow per square foot. Wet, compacted snow weighs much more than fresh powder—if your roof starts to sag or creak, call a roofing expert immediately.